Showing posts with label food. Show all posts

Wednesday, April 20, 2016

Q is for Queso @AprilA2Z #AtoZChallenge

As you've seen from H is for Hatch Chiles, they're the bee's knees in New Mexico and they're in everything here. Creme brulee, bagels, wine (no, I'm not kidding), and one friend even ordered a lobster roll with green chiles. Being from New England, she was not thrilled with the result, but that's not the point. The point is, New Mexicans love their chiles, even putting them in things that, well, probably shouldn't be tampered with.

But queso isn't one of them. It's made for Hatch chiles.

In the interest of finding a delicious restaurant-style queso dip you lovely readers can try, I tracked down two recipes on the interwebs (Pinterest, to be specific), and taste-tested them for you.

It's a tough job, but somebody's gotta do it.

Queso Recipe #1: Roasted Hatch Chile Queso Dip from Cook Like A Champion

A photo posted by Sarah Allan (@sarahallanauthor) on

First off, this recipe was very tasty! I got the American cheese from the deli (Boar's Head brand; I'm a bit of a deli snob), and the Monterrey Jack in a block from the regular 'ol cheese section which I took home and grated. I had everything prepped and sliced ahead of time which was good, because once we started, this dip came together quickly. I had a can of Hatch Green Chiles (whole), and there were probably 10 of them in the can, already skinned and seeded. They'd actually be perfect for stuffing, but that's for another time. Anyway, I chopped up two of them, and I think this recipe could actually use a third. These were very mild, but had a nice, sweet flavor to them. I was actually a little disappointed that it didn't have more heat and wasn't quiiiite as flavorful as I'd expected. The dip thickened very quickly once it was off the heat, and we microwaved it the next day (adding about a tablespoon of milk to thin it out and microwaving it in 30 second intervals, stirring after each) and it was just as good.

Queso Recipe #2: Roasted Hatch Chile Queso Dip from The Wicked Noodle

A photo posted by Sarah Allan (@sarahallanauthor) on


Though the other queso dip was good, this one was the clear winner! It had a stronger chile flavor (it uses 3 chiles instead of 2), and we thought it would be even better with another chile added. The Mexican cheese blend was better as well. It was very thick while mixing, but thinned out readily when the half-and-half was added. It also didn't firm up so much as it cooled that you couldn't dip a chip, a complaint we had about the first recipe.

Time for me to go warm some up and enter another cheese coma!

What's your favorite queso?

xoxo Sarah


Friday, March 25, 2016

#FoodieFriday: Roasted Asparagus #vegetarian

This is the last Foodie Friday I'll be doing for a few weeks due to my participation in the April A-Z Blogging Challenge, so I wanted to give you guys something easy.
Picture from Simply Stacie

Springtime is prime asparagus season, and nothing is more awesome than simply prepared vegetables.

In this case, Simply Stacie has the answer: Roasted Asparagus.

My personally favorite way to prepare asparagus is to grill it, but this recipe is more universal in that most of us have an oven but not everyone has a grill.

Basically, trimmed asparagus+olive oil+ salt & pepper and you're done. She uses garlic, which I think would also be fabulous, but I haven't used it when I've made this recipe yet. I'm lazy like that.

10 minutes in a 450 degree F oven, stirring/turning once at the halfway mark, and BOOM.

Such an easy side.

I hope you guys tune in for my A-Z Challenge posts!

xoxo Sarah

Friday, March 18, 2016

#FoodieFriday: Blackberry Sage Pork Chops

My poor husband and I share the same aversion to pork chops, though if you ask him, he's suffered worse.

Picture from Budget Bytes
Tortured by family who served dry, stringy, overcooked pieces of pork smothered in applesauce (his) or apples and sauerkraut (mine), I rarely bought them in order to save us both from food-related PTSD.

Pork tenderloin, on the other hand, enjoys a healthy rotation in our repertoire. And no, I don't overcook it. I pay close attention to the thermometer, thank you very much.

But this delicious recipe from Budget Bytes for Blackberry Sage Pork Chops has changed our tune.

I've made this recipe a couple of times; the first was with pork tenderloin I had in the freezer (cut into medallions), and the second was with pork chops as prescribed.

Though the recipe itself is very cost-conscious and uses simple ingredients--most of which you probably have in your pantry already--the amazing sauce is sweet and savory and makes you feel like you're eating a restaurant meal.

Just follow the directions and you're golden. If you're like me and ended up with pork tenderloin to use instead, thaw it if frozen and cut into medallions about an inch thick. Then proceed with the recipe as it's written. It'll be fabulous!

The biggest hurdle was, oddly, finding blackberry jam. I scoured the whole shelf and was only able to find a couple of brands, whereas most of the selection was strawberry, raspberry, grape, and a few others. I think, though, if you're in a pinch, you could probably use raspberry and it would come out very well.

If you're looking for a cost-conscious way to jazz up dinner, this is it!

xoxo Sarah


Friday, March 11, 2016

#FoodieFriday: Skillet Chocolate Chip Cookie

This cookie. Martha Stewart knew what she was doing.

Oh man.
Picture via Martha Stewart's website.

If I didn't have a good idea I'd make myself sick, I'd make this and eat the whole thing.

Besides serving about 8 people (fewer, most likely...), this cookie is absolutely gorgeous. It fills the cast iron skillet and looks so pretty. As if you needed another reason to use your 10-inch skillet.

Served straight from the oven (with a few minutes to cool so you don't sacrifice your poor burned mouth), it's gooey and satisfying.

It's perfect for scooping a bit of your favorite ice cream over, too.

And it doesn't get any better for parties--who wouldn't want to bring this out to the table!

Even better, it's not difficult to make. It comes together in a snap and you can enjoy your party, or enjoy making everyone else clean up while you eat the whole thing.

I won't judge.

xoxo Sarah


Friday, March 4, 2016

#FoodieFriday: Salisbury Steak Meatballs with Onion Gravy #comfortfood

I can't believe I missed last Friday's post, but no matter.  This week's will make up for it.

I've made these yummy Salisbury Steak Meatballs by Jo Cooks twice now, and both times they were a big hit with both hubs and me. The meat is flavorful; the gravy is delicious, and it's a must-serve with mashed potatoes and a good veggie. In the picture, you can see that I made roasted asparagus to go with it. 

This ain't no TV dinner Salisbury steak!

There are a good amount of leftovers (4 day's worth if there are two of you, so approximately 8 servings total), and they're even better as time goes on.

Some tips I've picked up--with this recipe, make patties, not meatballs. I did meatballs the first time, and they were very soft and didn't keep their shape, making them impossible to turn to brown when in the pan. Epic fail. I got frustrated (might be a slight understatement--I think I threw a not-very-adultlike fit that my poor husband had to witness), ended up squishing them into something resembling taco filling, then scooped the meat out and finished the gravy as directed. It tasted fine and all, but it wasn't pretty, nor did I get the nice browned fond on the bottom of the skillet as I'd wanted. The second time I'd learned my lesson--I made flat patties about the size of my palm. I think I got nine patties out of the meat mixture. This worked much better! They were easy to flip with my spatula, and I got the nice dark brown crust that I needed to make the gravy extra good. That's one patty on top of my mashed 'taters in the picture.

For leftovers, though, the rest of the meat and gravy went into a container, and we've been scooping out our desired servings that way. Add some additional stock (I used chicken stock in both the main recipe and when I re-warmed it; it's what I usually have open in my fridge) to make the meat and gravy serve-able again, and heat in a saucepan. It ends up kind of like Shepherd's Pie filling (really Cottage Pie because of the beef, but whatever), but it tastes the same.

As I mentioned above, I used chicken stock for the gravy. It says either chicken or beef, and I almost always have an open container of chicken stock in the fridge already, so that's what I used.

Mashed potatoes (either regular or mashed sweets) are my side of choice, along with a roasted vegetable or salad.

Even better, this whole thing comes together in about 30-45 minutes from start to finish, and, because of the leftovers, actually can save you time the next day. So it's a comfort food meal worth making.

What do you think?

xoxo Sarah


Friday, February 19, 2016

#FoodieFriday: Brown Sugar Mustard Chicken

There are a lot of chicken recipes out there. It's a popular meat; I get it. We eat a lot of chicken, too. But sometimes you come across one that shakes things up a bit and makes your mouth super happy.

I'm including this chicken recipe for a couple of reasons--one, because it's absolutely delicious, and two, because my dad is somehow convinced I'm withholding it and keeps asking for it every time we talk.
Photo from Taste and Tell

Yes, I've given it to both him and my mother. Multiple times.

No, I'm not holding it hostage. This is proof.

I first came across this recipe in Taste of Home magazine but was able to find it online here, at Taste and Tell.

For those of you who are skeptical about or aren't a huge fan of chicken thighs, they're necessary to use. They're meatier in flavor and stay juicier on the grill. Breasts just wouldn't hold up to the flavorful, savory sauce.

The chicken is best grilled, but I've made it baked in a pinch (put in a single layer in a baking dish or on a sheet pan and give it 25-30 minutes at 400 degrees or so). It comes out saucier, but still delicious.

And double the sauce. You won't regret it.

The leftovers are out of this world, too--since some sauce is kept to the side, it's great spread over them the next day, or right off the grill.

It's a good recipe for a crowd, too. It doubles or triples with the same results, providing you have a big enough vessel to hold all the chicken while you grill it in batches.

What to serve on the side? I like mashed sweet potato and grilled asparagus.

Let me know if you've tried this recipe!

xoxo Sarah


Friday, February 5, 2016

#FoodieFriday: Hawaiian Ham & Swiss Sliders #SuperBowl #appetizer #brunch

I can't believe I almost missed this week! And with Super Bowl Sunday coming up, I couldn't resist sharing one of my favorite appetizer/finger foods. Go, sports!

Before I get to this Friday's food, if you're vegetarian or want to bring something to a Super Bowl party that everyone will enjoy, try my Black Bean Hummus. Trust me--it's fantastic. Bring some blue corn tortilla chips and have at it!

Now for this week's: You've probably heard of them if you haven't already eaten them--Hawaiian rolls stuffed with ham and Swiss cheese and covered in buttery oniony poppy-seedy deliciousness.

Picture from A Musing Foodie
There are two main recipes I've seen, like this one from A Musing Foodie, and this one from the actual King's Hawaiian website

The one from A Musing Foodie is the one I've seen and made myself (the recipe can be cut in half but it's nice to have the large recipe just in case).

There is no downside to these little sandwiches other than how fast they disappear.

As for positives, well...

--You can use whatever ham you like: Virginia, regular, smoked...I'm not sure I'd use one of the very sweet varieties, though (like honey ham) but that's personal preference.

--If you're not in the U.S. and can't get the Hawaiian rolls, just pick up a package of small dinner rolls. When we were in England, I wouldn't have hesitated to use fresh dinner rolls from Tesco--but I would have gotten the mini-ones, not the full-sized rolls. Too big.

--They transport well. After you bake them, just put some foil on them and go! You can assemble them beforehand and bake them when you arrive (they take about 25-30 minutes) if you like as well, but don't worry if you bake them ahead of time.....

--Which leads me to the next big positive--they can be served warm, or room temperature. They're fantastic either way. So no hot plates, no crock pot, no keeping them covered in foil so they stay warm. Just put them out and watch the crowds descend on them like sharks on a surfer.

--If they all don't get eaten (hahahaha), they make great leftovers. I've had them the next day out of the fridge (maybe microwave them for 30 seconds-1 minute first?) and they're just as good.

--They're not just for game-day snacks. I've served them at brunches, and they're always a big hit. They straddle that is-it-breakfast-or-is-it-lunch line so well it's a crime to not have them on hand.

--Kids can help assemble. If you don't want them handling knives or hot stuff, just cut the rolls first and have them put the ham and cheese on them. You can do the butter sauce and oven bit.

Have you had these little sandwiches? What are you having for Super Bowl snacks? Some ham-and-Swiss sliders and black bean hummus, perhaps? Let me know your menu!

xoxo Sarah


Friday, January 29, 2016

#FoodieFriday: Bagels! #baking #bagel

GUYS! 

I totally made my own bagels. 

Only recently--within the past year or so--I've gotten more brave and comfortable with working with yeast breads. 

There's something intimidating about it; you have to be so careful to make sure the yeast activates, but that you don't kill it, either. 

Dough balls that will become bagels!
What I'm discovering is that it's much less finicky than I thought, and most of my creations have turned out okay.

Now, we love a good bagel. Hubs and I grew up in New England, and appreciate them, but it's sometimes hard to find a suitable one. 

So, I figured I'd give it a shot. How hard could it be?

Not very, actually. It just takes a little time, but once you're invested, you're good.

Here's the recipe I followed. It's from Artisan Bread in Five, and wasn't hard to do at all. No kneading, even. 

Dough rings.
I let it rise on the counter top in a giant bowl for a little less than five hours, but it had ridden enthusiastically by that point and had doubled in size from what I could tell. You can use that basic bread dough for whatever kind of shaped loaf you want--it appears to make a nice white bread.

A note on the refrigerator rising. I've heard that this recipe is fine to make without rising in the refrigerator for any period of time, and I've also heard that the dough changes positively when it's had an opportunity to rise in the fridge. This is after it's risen on the counter, by the way. So, because there are two of us and this recipe makes a lot of dough and I have a crappy tiny freezer on my side-by-side, I elected to make them as needed. So, after rising on the counter, I stuck the dough in the fridge (I just kept it in the bowl it had risen on the counter in and put plastic wrap on top) and it'll sit there and I'll use it as necessary, ripping off bits to make more bagels as we eat them.


Anyway, here's the instructions for how to turn that dough recipe into bagels.

Be careful when handling the dough--it's very sticky, and tends to stick to you, your cutting board, itself, and anything else, so make sure everything is liberally floured.

Some boiled bagels on the left, some boiling in my stock pot.
I never realized how important boiling the bagels is to the process, but there was a very neat and marked texture change to the dough after it had been in the water for a bit.  Also, I used an 8 quart stock pot for the water, and used about 6 quarts. Honestly, if I used my huge pasta pot to get the full 8 quarts, the water would have taken forever to boil, and it seemed to come out fine. Just don't overcrowd the bagels when boiling them.

I did eight bagels, and made four of them sesame and four plain. I poured some sesame seeds into a bowl and patted both sides of the boiled bagels in the seeds. Worked like a charm. For the plain ones, I just kept the bottoms floured so they didn't stick.

BAGELS! (The white stuff is just excess flour.)
They both came out great. The sesame ones are, unfortunately, really frigging messy. I think I'll be finding sesame seeds until we move again. But they are delicious. They were much thinner than I thought they'd be, and were much easier to cut in half the next day. Otherwise, we just smeared cream cheese on the outsides and called it good.

We're storing them in zipper bags for now.

I'd definitely make them again. Most of the time was spent waiting for the dough to rise, but the dough itself mixed up in about 10 minutes. I think you could even do individual flavors. Because you rip off bits of dough to make each bagel, you could rip off some dough and massage in some raisins and cinnamon, or some blueberries, or some cheddar cheese. They're all made individually, so you could make all of these in the same batch. That might be what I try when we run out of this batch.

Have you made your own bagels before? Let me know if you try this recipe!

xoxo Sarah


Friday, January 22, 2016

#FoodieFriday: Slow-cooker Mongolian Beef #CrockPot #SlowCooker

As I've mentioned before, we recently moved and received all of our household goods.

Let me tell you, going through everything you own is not as fun as it sounds, and it sounds pretty awful.

In order for us to have some semblance of healthy eating (e.g. not ordering pizza because we forgot to food), I've rekindled my love-affair with my crock pot.

I was so excited when I unearthed it from the boxy jungle (and to finally try some of the awesomeness on my Crock Pot Pinterest board) that I actually had trouble coming up with what I wanted to do first. I should also add that I nixed any stews or soups right off the bat--we'd just come from a week of them (I've had a nasty cold so I was eating chicken soup like it was going out of style, and hubs was eating sandwiches to avoid the soup), so I took pity on him.

This time.

Anyway, we get most of our damage-checking done on the weekends, so, last week, I did some uncharacteristic meal planning to make sure that after wrapping and re-wrapping yet more items, we'd have a hot meal waiting.

The meal I chose was Slow Cooker Mongolian Beef from I Am That Lady. I guess it's a knockoff of P.F. Chang's Mongolian Beef, but easier because it's in the slow cooker, but I haven't had it so I can't tell you how accurate the comparison is.


We loved it, though--we served it with brown rice, steamed broccoli, and sliced green onions.

I did a 2.5lb chuck roast (you could probably do a bigger roast but use more of the sauce ingredients to make sure it's seasoned) then trimmed it to within an inch of its life of excess fat. I know some people are weird about it, but I went all out--there was a big vein of it running through the middle and I cut it right out. Didn't have an effect on the dryness; the roast was nice and juicy and tender.

Low sodium soy sauce is a must here--it'll probably be a salt lick otherwise. And I used fresh (frozen, actually) ginger and fresh garlic. Neither were overpowering and gave a nice flavor to the meal

Also, I did the thickening at the end, but I had to use at least a few more tablespoons of corn starch. It just didn't want to thicken for me, but it could be altitude. But, with a little patience, we got it where we wanted it.

With the 2-2.5lb roast, it makes about 6 servings, so we ate it for 3 days; plenty for two people who aren't fond of a week's worth of leftovers and crave something different after day three.

It's always nice when trying a recipe for the first time works out so well!

xoxo Sarah


Friday, January 15, 2016

#FoodieFriday: Chicken and Wild Rice #Soup

Much to my poor husband's dismay, it's soup season.

I can eat soup all the time--he, unfortunately, cannot. But his complaining is kept to a minimum, and I usually end up freezing a good amount for later so he's not tortured all at once. Must spread the torture out over multiple days, you see--it's how a good marriage works.

But in all seriousness, I do love a good soup, and enjoy experimenting with ones I find to make them work for us.

One I tried last week was Bowl of Delicious's Chicken and Wild Rice Soup--a nice twist on chicken soup, which is one of my quick go-tos. I generally prefer mine with noodles, but rice is also good, and wild rice is fun and adds a different texture, so I was game.

First, I want to address that, yes, you can find just wild rice in the grocery store. Not just the Uncle Ben's mix with white rice, but regular wild rice--it will likely look like longer black grains. That's what you'll use in this recipe.

The recipe in its own is good and easy to make, but I've made enough chicken soups to know that I wanted to make a couple of changes to the recipe. Nothing major, but here's what I did:

-- 2 cloves minced garlic toward the end of the vegetable sauteing time
-- added a bay leaf (either 1 small, or half a large one)
-- a few dashes of dried thyme leaves, and a dash of dried sage (probably a half teaspoon and quarter teaspoon or less respectively, but I didn't measure)
-- fresh parsley, chopped fine, when the broth was added (probably 2T total, but I didn't measure--also, if you use dried parsley, only use a teaspoon or two...dried herbs pack more of a punch, so you need about a third less)

My soup needed about an hour for the rice to cook completely and not be too chewy. It should be a little chewy, though, but not difficult to bite or hard. 50 minutes-1 hour should do it.

Finished Chicken and Wild Rice soup.

I ended up freezing the soup in a few portions as well. For prolonged soup torture, you see.

I love you, husband.

Let me know if you've tried this recipe and what you think!

xoxo Sarah


Friday, January 8, 2016

#FoodieFriday: Swiss Cheese Chicken #Casserole

Whew. I'm tired.

After moving, getting most of our household goods right before the holidays, then unpacking the bedroom and kitchen, then the holidays, then traveling for a ski trip, then getting the rest of our household goods, then more unpacking, I'm ready for a nap.

Or long-term hibernation.

But the cats would still try to wake me up from that, so here I am.

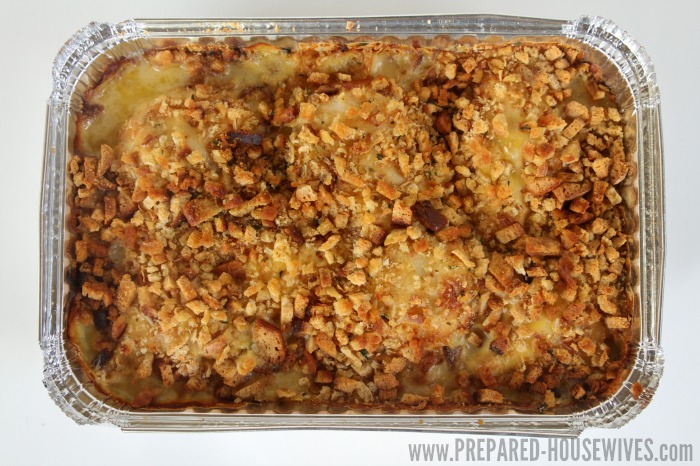
I'm writing this surrounded by boxes, which are reason enough for making the following recipe: Swiss Cheese Chicken Casserole.

Pic from Prepared Housewives
I'll apologize in advance--the Prepared Housewives site has a lot of annoying ads and stuff, but this recipe is sound. No, it's not the best thing for you, but there are worse things to put in your mouth when you want a quick-ish, comfort-foody meal.

Like I did this evening after an unplanned trip to Lowes to get new hoses for the washing machine so it didn't turn the laundry room floor into a flood plain.

Anyway...

This casserole comes together quickly--there are only a handful of ingredients. It also freezes nicely, so if you want to go that route, stop after the soup step and cover it in foil. Then, when you're ready to heat it, thaw it and put the stuffing and butter on. Then it's oven time!

You can pick your favorite cheese, too--I've heard that pepperjack is good.

I served it with peas, but that's just because it was the first vegetable I grabbed in my freezer. Pick whatever you want.

One last thing--I have no idea why it says to serve it over rice. There is plenty going on with the recipe and nice crunchy stuffing on top that the rice is unnecessary.

And this recipe has a special place in my heart. The first time I had it, my husband and I had just moved to England. Our sponsor family brought us a home-cooked meal for us to warm up--this chicken dish. Having something warm and delicious and not fast-food was so very much appreciated, even if figuring out the oven in our small temporary apartment was a nightmare.

It's warm, and tasty, and great for busy nights when you're debating just stopping at the nearest drive-thru and having done with it.

Let me know if you've tried this recipe!

xoxo Sarah

Friday, December 18, 2015

#FoodieFriday: Black Bean Hummus #appetizer #vegetarian #vegan

I thought I'd treat you lovely readers to one of my own recipes today. I first had it at a friend's house, and I asked her for the recipe. She's a self-proclaimed "dump cook", i.e. she doesn't do much measuring and just adds things to taste, which can work out well for some folks but frustrates me to no end. I like to know amounts, and then I can play around with a recipe from there.

So, after much Googling for similar recipes and experimenting (no hardship, trust me--I enjoyed the taste-testing), I came up with a version of her Black Bean Hummus that I was extraordinarily happy with. 

Sorry, I've never taken a picture of the finished product, so here are two cans of beans from my pantry instead.

I'll be honest--the finished recipe isn't the most attractive thing. It's a grayish paste (think, well, hummus, but gray because of the black beans), and sometimes takes some convincing for people to try it. Serve it in a pretty bowl to help with the "eat with your eyes" thing.

Bonus: This recipe is vegetarian at the very least, and quite possibly vegan, so everyone at your party should be happy. I'm not a vegetarian or vegan, so I haven't verified this, so don't quote me. It's tasty and there is no meat or dairy, at any rate. You can likely make the whole thing with organic ingredients too (I just noticed that some spices at the store were organic). Do what works for you.

Some tips: 

The party-sized recipe makes a ton (3x the regular amount) so I pared it down for personal consumption--there are two amounts listed for each ingredient to make it easy. It also keeps for a while in the fridge, and I'd advise making it a day or two before to let the flavors blend.

I'd recommend making it in a good-sized food processor or a powerful blender. You'll need something that can power through the beans and other ingredients--it gets quite thick, and I take no responsibility for burning out your wimpy food processor in the midst of holiday celebration prep.

Tahini is ground sesame paste. It's kind of oily on top (like natural peanut butter) so give it a good stir before you measure it out. Please don't drain the oil; mix it in. You'll likely find it near the peanut butter or even in the international aisle. If you can't track it down, ask someone at your grocery store to help find it.

If you're averse to cilantro, try the recipe as written first. It's not overpowering. 

And yes, please use fresh lime juice. It might take a bit to get enough lime juice for the recipe, but it's worth it. I've done the "cheat" method and used bottled lime juice before; it's not the same and made me sad. Another tip: buy a bunch more limes than you think you'll need. Sometimes they're very dry inside; sometimes they're really juicy. It's the luck of the draw, really, so be prepared. Worst case, you can always use the extras in drinks, or to make some snazzy flavored water, or to prevent scurvy on your ocean voyages.

The ingredients are easily customized and more to taste than anything, but these are good starting points. The recipe is amazing as-is, but if you like more garlic, add more garlic. Love cilantro? Add more! You get the idea.

Though serving it with cut-up vegetables is good, my favorite vehicle for this hummus is blue corn tortilla chips.


Black Bean Hummus
Ingredients (party-sized recipe in parentheses):
2 cans of black beans, rinsed well and drained (6 cans for a party)
¼ C fresh-squeezed lime juice (3/4C for party)
3T + 1t tahini (10T for party)
4 cloves garlic, roughly chopped (12 cloves for party)
pinch red pepper flakes (1/4 t or to taste for party)
2 T olive oil (6 T for party)
1 ½ t ground cumin (4 ½ t for party)
2 T cilantro, roughly chopped (1/3 C for party)
1 t salt (3 t for party) or to taste—can depend on how salty the beans are
1/4 t black pepper (1 t for party)

Directions:

Combine all ingredients in a food processor, and process until a very smooth paste forms. Scrape sides and stir as necessary.  Serve with tortilla chips, bread sticks, bread slices, or a veggie platter.

Let me know if you make this! I'd love to know what you think.

xoxo Sarah

Friday, December 11, 2015

#FoodieFriday: Date Nut Pinwheels #ChristmasCookies

Okay, I'm hearing a lot of hate for the traditional sugar cookies--you know the ones. Thinly roll out a big rectangle (okay, blob) of dough, push cookie cutters through, and decorate before or after they come out of the oven.

I remember making them with my mother, but I'll take a drink of that haterade--if you're making them with kids, get ready for a gigantic mess; they're pretty bland for what should be a fun cookie; and the shapes fall apart (decapitated reindeer, anyone?).

No wonder she always made rum balls afterward...

Enter something different--Date Nut Pinwheels. These are my father-in-law's favorite cookie, and I finally had a chance to eat them this past winter. His mother (one of my husband's grandmothers) would make them for the holidays, and my mother-in-law doesn't really care for baking, so it was at my husband's aunt's house that I got to sample them.

YUM.

I'm not sure why I thought it would be a crispy cookie, but it was nice and soft and a little chewy, made even more chewy because of the date filling. The mouthfeel--yeah, mouthfeel--of these cookies is lovely.

And I'm a procrastinator of the highest order, so about a week ago I finally got around to asking one of hub's cousins if she could get the recipe from her mom. (Thanks, Beth!). I'm not sure what cookbook it's from, but below are the pictures she sent. I don't claim ownership of the recipe, but I'd assume it's from Gold Medal Flour given the product placement. Please don't sue me, Gold Medal Flour.

The first picture is for the base recipe for the cookie dough, and the second is for how to use that cookie dough to make the Date Nut Pinwheels.

Some cookie tips: don't skimp on the chilling. It says chill until firm; throw that dough in the fridge and chill it! What does that even do? It helps the dough not spread too much when baking. If the dough is warm, you'll get date nut blobs, not pinwheels.

I realize the recipe is a little vague on what kind of nuts to use (very vague--just says "nuts"), but I'd probably go with pecans or walnuts.

And use yourself some parchment paper. Trust me. That stuff makes baking a whole lot more enjoyable.


Let me know if you make the recipe! I hope you enjoy them as much as we do.

xoxo Sarah


Friday, December 4, 2015

#FoodieFriday: Oven-Baked Chicken Fajitas

I love fajitas. The problem is that they're obnoxious to order in a restaurant (they simply take up too much real estate on the table, but sometimes I just don't care). If you're making them at home, sometimes the weather outside just doesn't cooperate. The best ones I've made have a tequila-lime marinade, but these, like most, require a grill.

Pic from Life in the Lofthouse
Enter these Oven-Baked Chicken Fajitas from Life in the Lofthouse. They're are absolutely perfect for a busy day (long work day, holiday stuff, you name it)--they take very little prep time, have the meat and veggies built in, and have a lot of flavor for some simple ingredients. And, as you probably guessed, they're made right in your oven.

A few tiny changes/adaptations I made: I used no-salt-added diced tomatoes, and added a little salt to the spice mix to have more control over how much was added to the dish. You could also add a can of diced green chilies, or diced tomatoes that have them already in there.

Make sure to generously cut the peppers and onions. If you slice them too thin, they'll be too soft and flexible after baking and will have lost that satisfying crunch you want. I'd say slice them about a half-inch thick. I was very happy with how ours came out. And use whatever color peppers you want--whatever's cheapest at the store, or whatever looks good.

Even with the two of us, this dish will provide a few days of leftovers. Yum!

xoxo Sarah


Friday, November 20, 2015

#Thanksgiving Bonus #FoodieFriday: Roasted Carrots

Okay, I couldn't resist posting another one. Hey, next week is Thanksgiving, at least for those in the U.S., and who doesn't enjoy good food?

I've been seeing a ton of "Help! What should I make?" posts on the Internet (jeez, Facebook, haven't you ever eaten a Thanksgiving dinner?), and I thought I'd help out a little.

A lot of the questions are wondering what to make for a vegetable side. Most people say they're
Pic from the Food Network
already having the standard green bean casserole and/or sweet potato casserole, so they want something different or something that's not a casserole, too.

My suggestion would be to make these amazing roasted carrots. The recipe is from the Barefoot Contessa herself, Ina Garten.

I often mix the carrots with parsnips, which creates a pretty orange and cream dish. I usually cut the parsnips slightly smaller than the carrots because they're more dense, and that way the whole thing will cook at the same rate.

This dish transports well, too. In the past I've served it out of warmed-up Corningware (or whatever you have that's oven-safe), put foil on top, and brought it with me. It warms up nicely if it does cool off as well. I've brought it to a few Thanksgivings, and have been asked for the recipe each time. People are always shocked by how simple the dish is.

And I'm a big fan of "everything in moderation", but if you or someone you know is trying to keep their Thanksgiving intake on the lighter side, this dish is perfect for that. No cream or heavy butter (as much as I love those things) and though these carrots are good in their own right, they don't distract from the main event--that fabulous turkey.

A quick word about leftovers: The carrots are great warmed up, and, if you have enough of them, I would also suggest finding a good carrot soup recipe and pureeing them to make that. They're very versatile.

Enjoy!

xoxo Sarah


#FoodieFriday: Double Chocolate Banana Bread

I hope you liked the coconut bread from last week, because I have another awesome recipe from Smitten Kitchen today: Double Chocolate Banana Bread.

It's a crime against humanity not to make this bread.

This is, hands down, the best banana bread--and maybe the best quick bread--I've ever made.

It's rich and chocolaty, and comes together quickly and without much fuss. It's moist (yes, you all should know how damn much I hate that word, but it's so perfect for this bread so shut up), and pretty much like eating chocolatey cakey bananay goodness that you shouldn't even be allowed to consume.

Pic from Smitten Kitchen
Your guests and/or gift recipients will beg you for the recipe, and this is the perfect quick bread with which to make people owe you favors.

The loaves even freeze well, in case you don't manage to inhale them like we do.

I'll add the same note about bread sizing as before: if a bread makes one 9x5 loaf, it will make two 8x4s. And, if you're making mini-loaves, it will likely make 4 of those. Just make sure the batter is distributed evenly. I have a mini-loaf pan and will typically do one spoonful in each, then a second, than a third to make sure they're all the same size.

I'm going to keep this short, because any more time reading this and fewer minutes baking this amazing bread would be an absolute crime. 

Let me know what you think! Have you made this bread before? 

xoxo Sarah


Friday, November 13, 2015

#FoodieFriday: Coconut (Quick) Bread

I promised you lovelies a couple of gift-worthy quick breads before the holidays, and that's what I'm aiming to deliver. One this week, one next week. Get your loaf pans ready!

Pic from Smitten Kitchen
For the uninitiated, a quick bread uses leaveners other than yeast to make the bread rise: baking soda/baking powder, etc. Because there's no yeast, there's no rising period, and the bread can be made quickly. Quick bread. Get it? They can be sweet or savory, but are generally very forgiving batter-wise and end up tasty.

First up: Smitten Kitchen's Coconut Bread.

This quick bread baked up beautifully, golden and crunchy. It was fantastic warm and with some butter.

The coconut flavor is noticeable but not overpowering. I'm not a huge coconut lover--I'm not necessarily going to order a pina colada, for instance--but I love this bread.

Plus, it's something different. Everyone around the holidays makes gingerbread, or pumpkin bread, or some kind of bread that involves nutmeg and cinnamon, and those can get tiring after a while. Don't get me wrong; that's one of the things I love around the holidays, but this bread will be a breath of fresh air.

A quick note on the size: if a bread makes one 9x5 loaf, it will make two 8x4s. And, if you're making mini-loaves, it will likely make 4 of those. Just make sure the batter is distributed evenly. I have a mini-loaf pan and will typically do one spoonful in each, then a second, than a third to make sure they're all the same size.

Happy gifting (if they even make it that far--you'll probably eat them all first and have to make a second batch).

xoxo Sarah

Friday, November 6, 2015

#FoodieFriday: No-Knead Crusty Bread

Want to dazzle your guests with your home-made bread skills this holiday season? Never baked with yeast and making your own bread terrifies you? Think you can't make your own bread without a bread machine? Just looking for something to have with your soup?

If the answer is "yes" to any of those things, sit yourself down right now and listen up.

This No-Knead Crusty Bread recipe from Simply So Good deserves to be in your regular rotation.

A single batch of bread dough, risen for 18ish hours--sharp cheddar and dried dill.
Before I had made it, I was terrified of baking with yeast. I can make quick-breads with the best of them (and, oh, do I have some good ones for YOU, which I'll be sure to post on other Foodie Fridays before the holidays because---INSTANT GIFT!), but the idea that I had to add something alive (and therefore touchy and hard to control) to my food was nerve-racking. What if my water was too hot and I killed the yeast? What if my water was too cold and the whole thing stayed a floury glob that never rose?

But I tried it anyway--this recipe is surprisingly forgiving--and, oh man, is it good. It's also served as a gateway drug to my making other yeast breads with more confidence.

Our favorite variation is to add shredded sharp cheddar (about 1-1.5 cups) and some dill weed to it. That's the bread that I've shown in the pictures here. And search the Simply So Good page for variations including rosemary/Gruyere/lemon and cranberry/orange/almond. It's a very neutral-based bread, so you can make it sweet or savory. Have fun with it!

The recipe even doubles nicely.

Finished cheddar-dill bread! Gorgeous and crunchy.
A word on the cooking pot. You don't need the most expensive thing out there to make this recipe. I'd make it in my Le Cruset if I could, but I don't own one. However, I do have a great one from Lodge that gets a ton of use (I want another one, husband if you're listening...) between the bread and making soups and stews and even for frying things because it keeps such a nice even temperature. It's 6 quarts and blue and gorgeous. The red one is calling my name.

Ahem.

My point being, you don't have to break the bank for a cooking pot just to use to make this bread, but if you do get one, that's the one I'd recommend for the price and for the amount of use it would get. You'll seriously cook things just to use it. Cleans up like a dream, too.

Have you made this bread before? What's your favorite variation?

xoxo Sarah

Friday, October 30, 2015

#FoodieFriday: Goat Cheese and Roasted Pepper Crostini

I'm a big fan of tiny food--something you can eat in a bite or two. Tea sandwiches; tiny tarts, what have you; there just has to be enough of it to make a meal, or at least a substantial part of it.

Now, my husband isn't a fan of tomatoes--the closest thing besides red sauce for pasta or pizza or salsa I could get him to willingly eat was "tomato bread" when we were in Barcelona, which, admittedly, was in a class all its own.

I love bruschetta, but I'd be making a disappointingly tiny amount for just me to eat. I'm not opposed to it, but most of the time I make things we'll both eat.

So, I found this recipe for Goat Cheese and Roasted Pepper Crostini on Cook Like A Champion. It was the perfect compromise--tiny bits of bread decorated with snowy goat cheese and pepper confetti.

Picture from Cook Like A Champion

I made a few alterations to the recipe, though. I cheated a bit and bought a jar of roasted red peppers (I thoroughly drained what I wanted to use and they worked wonderfully sliced into very thin ribbons), and I discovered at the last minute that my poor basil had committed suicide (gone moldy) so I didn't use it. I didn't measure the olive oil when pouring it over the baguette slices, but I did use a paper towel to dab it around and somewhat evenly coat the bread. As for mixing the peppers with olive oil and ground pepper, I figured that the peppers were flavorful enough and skipped out on this. I did put some freshly ground black pepper over the tops before serving, though.

Oh, and a slice of baguette cut on a bias to get slightly more surface area worked great--and after cutting a few, I discovered that a thin slice of about a half inch was perfect. Just wide enough to be supportive of the goodies on top, but not thick enough to cut your mouth up on the crunchy slice while chewing.

The garlic is a must-do--my favorite part of making them was to smear the garlic clove all over the hot, olive-oily bread.

We served it with tuna in extra virgin olive oil scooped up with more baguette, and it was a wonderful light meal.

Hubs liked it so much he insisted we make it when we have our (eventual) house warming party, and he's already requested it a second time in the same week.

I think we have a winner!

xoxo Sarah


Friday, October 23, 2015

#FoodieFriday: One-Pot Andouille Sausage Skillet Pasta

We normally go grocery shopping on the weekends, though we will pick up fresh produce and things during the week. But when I'm actually AT the grocery store, I prefer to get fresh food for that day's big meal (or for the next night) while I'm there. Nothing like getting home and thinking, "Well, crap. No idea what's for dinner tonight. Should have picked something up."

To combat this, we've started combing through my Pinterest boards for inspiration. I'm often working, so as much as I like food, I like easy meals just as much. Even better are one-pot meals that don't have a ton of clean-up. So a while ago I'd found a bunch of one-pot meals on Pinterest and went crazy pinning them.

One of the first we picked was this lovely recipe from Damn Delicious: One Pot Andouille Sausage Skillet Pasta.

The Andouille--a cajun-spiced sausage that has a little heat but nothing super overwhelming--really makes it. And even better, this recipe re-warms with the best of them. I think we ate it for three or four days straight without getting sick of it, which is a rarity for us leftover-haters. Don't get me wrong--we eat them. We may just not enjoy it as much as some people do.

How about you--do you like one-pot meals? Have a favorite? Share it in the comments!

xoxo Sarah