Friday, January 29, 2016

#FoodieFriday: Bagels! #baking #bagel

GUYS! 

I totally made my own bagels. 

Only recently--within the past year or so--I've gotten more brave and comfortable with working with yeast breads. 

There's something intimidating about it; you have to be so careful to make sure the yeast activates, but that you don't kill it, either. 

Dough balls that will become bagels!
What I'm discovering is that it's much less finicky than I thought, and most of my creations have turned out okay.

Now, we love a good bagel. Hubs and I grew up in New England, and appreciate them, but it's sometimes hard to find a suitable one. 

So, I figured I'd give it a shot. How hard could it be?

Not very, actually. It just takes a little time, but once you're invested, you're good.

Here's the recipe I followed. It's from Artisan Bread in Five, and wasn't hard to do at all. No kneading, even. 

Dough rings.
I let it rise on the counter top in a giant bowl for a little less than five hours, but it had ridden enthusiastically by that point and had doubled in size from what I could tell. You can use that basic bread dough for whatever kind of shaped loaf you want--it appears to make a nice white bread.

A note on the refrigerator rising. I've heard that this recipe is fine to make without rising in the refrigerator for any period of time, and I've also heard that the dough changes positively when it's had an opportunity to rise in the fridge. This is after it's risen on the counter, by the way. So, because there are two of us and this recipe makes a lot of dough and I have a crappy tiny freezer on my side-by-side, I elected to make them as needed. So, after rising on the counter, I stuck the dough in the fridge (I just kept it in the bowl it had risen on the counter in and put plastic wrap on top) and it'll sit there and I'll use it as necessary, ripping off bits to make more bagels as we eat them.


Anyway, here's the instructions for how to turn that dough recipe into bagels.

Be careful when handling the dough--it's very sticky, and tends to stick to you, your cutting board, itself, and anything else, so make sure everything is liberally floured.

Some boiled bagels on the left, some boiling in my stock pot.
I never realized how important boiling the bagels is to the process, but there was a very neat and marked texture change to the dough after it had been in the water for a bit.  Also, I used an 8 quart stock pot for the water, and used about 6 quarts. Honestly, if I used my huge pasta pot to get the full 8 quarts, the water would have taken forever to boil, and it seemed to come out fine. Just don't overcrowd the bagels when boiling them.

I did eight bagels, and made four of them sesame and four plain. I poured some sesame seeds into a bowl and patted both sides of the boiled bagels in the seeds. Worked like a charm. For the plain ones, I just kept the bottoms floured so they didn't stick.

BAGELS! (The white stuff is just excess flour.)
They both came out great. The sesame ones are, unfortunately, really frigging messy. I think I'll be finding sesame seeds until we move again. But they are delicious. They were much thinner than I thought they'd be, and were much easier to cut in half the next day. Otherwise, we just smeared cream cheese on the outsides and called it good.

We're storing them in zipper bags for now.

I'd definitely make them again. Most of the time was spent waiting for the dough to rise, but the dough itself mixed up in about 10 minutes. I think you could even do individual flavors. Because you rip off bits of dough to make each bagel, you could rip off some dough and massage in some raisins and cinnamon, or some blueberries, or some cheddar cheese. They're all made individually, so you could make all of these in the same batch. That might be what I try when we run out of this batch.

Have you made your own bagels before? Let me know if you try this recipe!

xoxo Sarah


Tuesday, January 26, 2016

Back at it!

Just a quick check-in...

So, now that things have calmed down a bit here (still checking stuff for damages, but we're doing really well on that!), I'm going to get back to writing.

The problem was that for a few days, I was convinced I'd misplaced everything I had for Fate's Awakening

Whoops.

But never fear! I excavated it from a plastic bin (it was hiding among other look-alike folders, the bastard) and I'm gonna be all over it like a fat kid on cake.

I'm also working on what to do for the April A-Z Blogging challenge this year. 

Any suggestions would be appreciated!

xoxo Sarah

Friday, January 22, 2016

#FoodieFriday: Slow-cooker Mongolian Beef #CrockPot #SlowCooker

As I've mentioned before, we recently moved and received all of our household goods.

Let me tell you, going through everything you own is not as fun as it sounds, and it sounds pretty awful.

In order for us to have some semblance of healthy eating (e.g. not ordering pizza because we forgot to food), I've rekindled my love-affair with my crock pot.

I was so excited when I unearthed it from the boxy jungle (and to finally try some of the awesomeness on my Crock Pot Pinterest board) that I actually had trouble coming up with what I wanted to do first. I should also add that I nixed any stews or soups right off the bat--we'd just come from a week of them (I've had a nasty cold so I was eating chicken soup like it was going out of style, and hubs was eating sandwiches to avoid the soup), so I took pity on him.

This time.

Anyway, we get most of our damage-checking done on the weekends, so, last week, I did some uncharacteristic meal planning to make sure that after wrapping and re-wrapping yet more items, we'd have a hot meal waiting.

The meal I chose was Slow Cooker Mongolian Beef from I Am That Lady. I guess it's a knockoff of P.F. Chang's Mongolian Beef, but easier because it's in the slow cooker, but I haven't had it so I can't tell you how accurate the comparison is.


We loved it, though--we served it with brown rice, steamed broccoli, and sliced green onions.

I did a 2.5lb chuck roast (you could probably do a bigger roast but use more of the sauce ingredients to make sure it's seasoned) then trimmed it to within an inch of its life of excess fat. I know some people are weird about it, but I went all out--there was a big vein of it running through the middle and I cut it right out. Didn't have an effect on the dryness; the roast was nice and juicy and tender.

Low sodium soy sauce is a must here--it'll probably be a salt lick otherwise. And I used fresh (frozen, actually) ginger and fresh garlic. Neither were overpowering and gave a nice flavor to the meal

Also, I did the thickening at the end, but I had to use at least a few more tablespoons of corn starch. It just didn't want to thicken for me, but it could be altitude. But, with a little patience, we got it where we wanted it.

With the 2-2.5lb roast, it makes about 6 servings, so we ate it for 3 days; plenty for two people who aren't fond of a week's worth of leftovers and crave something different after day three.

It's always nice when trying a recipe for the first time works out so well!

xoxo Sarah


Friday, January 15, 2016

#FoodieFriday: Chicken and Wild Rice #Soup

Much to my poor husband's dismay, it's soup season.

I can eat soup all the time--he, unfortunately, cannot. But his complaining is kept to a minimum, and I usually end up freezing a good amount for later so he's not tortured all at once. Must spread the torture out over multiple days, you see--it's how a good marriage works.

But in all seriousness, I do love a good soup, and enjoy experimenting with ones I find to make them work for us.

One I tried last week was Bowl of Delicious's Chicken and Wild Rice Soup--a nice twist on chicken soup, which is one of my quick go-tos. I generally prefer mine with noodles, but rice is also good, and wild rice is fun and adds a different texture, so I was game.

First, I want to address that, yes, you can find just wild rice in the grocery store. Not just the Uncle Ben's mix with white rice, but regular wild rice--it will likely look like longer black grains. That's what you'll use in this recipe.

The recipe in its own is good and easy to make, but I've made enough chicken soups to know that I wanted to make a couple of changes to the recipe. Nothing major, but here's what I did:

-- 2 cloves minced garlic toward the end of the vegetable sauteing time
-- added a bay leaf (either 1 small, or half a large one)
-- a few dashes of dried thyme leaves, and a dash of dried sage (probably a half teaspoon and quarter teaspoon or less respectively, but I didn't measure)
-- fresh parsley, chopped fine, when the broth was added (probably 2T total, but I didn't measure--also, if you use dried parsley, only use a teaspoon or two...dried herbs pack more of a punch, so you need about a third less)

My soup needed about an hour for the rice to cook completely and not be too chewy. It should be a little chewy, though, but not difficult to bite or hard. 50 minutes-1 hour should do it.

Finished Chicken and Wild Rice soup.

I ended up freezing the soup in a few portions as well. For prolonged soup torture, you see.

I love you, husband.

Let me know if you've tried this recipe and what you think!

xoxo Sarah


Friday, January 8, 2016

#FoodieFriday: Swiss Cheese Chicken #Casserole

Whew. I'm tired.

After moving, getting most of our household goods right before the holidays, then unpacking the bedroom and kitchen, then the holidays, then traveling for a ski trip, then getting the rest of our household goods, then more unpacking, I'm ready for a nap.

Or long-term hibernation.

But the cats would still try to wake me up from that, so here I am.

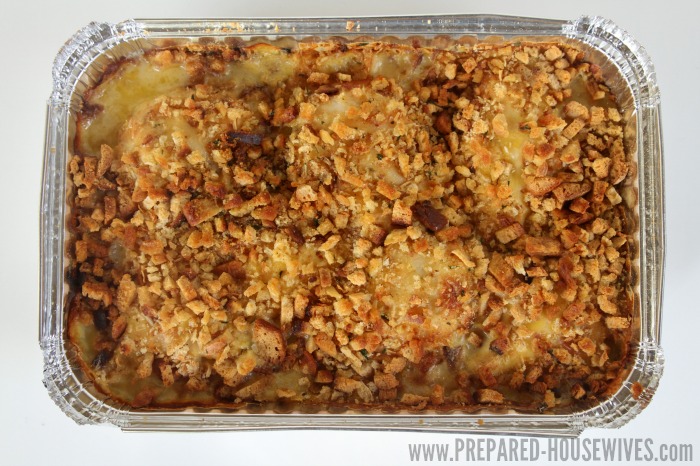
I'm writing this surrounded by boxes, which are reason enough for making the following recipe: Swiss Cheese Chicken Casserole.

Pic from Prepared Housewives
I'll apologize in advance--the Prepared Housewives site has a lot of annoying ads and stuff, but this recipe is sound. No, it's not the best thing for you, but there are worse things to put in your mouth when you want a quick-ish, comfort-foody meal.

Like I did this evening after an unplanned trip to Lowes to get new hoses for the washing machine so it didn't turn the laundry room floor into a flood plain.

Anyway...

This casserole comes together quickly--there are only a handful of ingredients. It also freezes nicely, so if you want to go that route, stop after the soup step and cover it in foil. Then, when you're ready to heat it, thaw it and put the stuffing and butter on. Then it's oven time!

You can pick your favorite cheese, too--I've heard that pepperjack is good.

I served it with peas, but that's just because it was the first vegetable I grabbed in my freezer. Pick whatever you want.

One last thing--I have no idea why it says to serve it over rice. There is plenty going on with the recipe and nice crunchy stuffing on top that the rice is unnecessary.

And this recipe has a special place in my heart. The first time I had it, my husband and I had just moved to England. Our sponsor family brought us a home-cooked meal for us to warm up--this chicken dish. Having something warm and delicious and not fast-food was so very much appreciated, even if figuring out the oven in our small temporary apartment was a nightmare.

It's warm, and tasty, and great for busy nights when you're debating just stopping at the nearest drive-thru and having done with it.

Let me know if you've tried this recipe!

xoxo Sarah